Caring for your transmitter
Proper care and maintenance of your transmitter will ensure optimal performance and continued reliability.
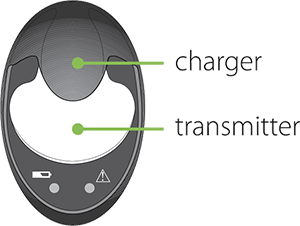
Charging your transmitter
Charging your transmitter after each sensor use is important so your transmitter battery lasts 7 days.
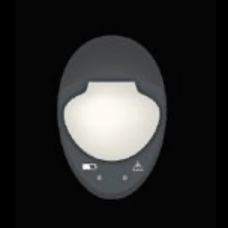
When the transmitter is charging, a green light flashes on the gray charger. When charging is complete, the green light on the charger turns off. It can take up to two hours to fully recharge, but typically only takes 15 to 20 minutes. A fully charged transmitter can be used for a maximum of seven days without recharging.
Note: Your transmitter may look different, but the steps to charging it are the same as shown here.

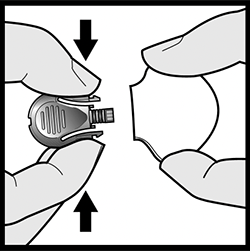
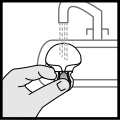
Removing the transmitter from the charger
When you remove the transmitter from the charger, a green light should flash on the transmitter. If you don’t see the green light flash on the transmitter, place the transmitter back on the charger until it is fully charged.

Troubleshooting
If you connect your transmitter to the charger and you see no lights on the charger or a flashing red light, replace the AAA battery in the charger. If there are still no lights on the charger after replacing batteries, contact 24-Hour Technical Support at 1-800-646-4633 and select option 1.
Check out more transmitter battery tips.
Cleaning your transmitter
Note: Your transmitter may look different, but the steps to cleaning it are the same as shown here.
Removing adhesive residue
If you have adhesive residue on your transmitter, here’s how to remove it:
Make sure the tester is attached to the transmitter.
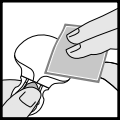
- Soak a cotton swab in a medical adhesive remover.
Hold the tester and gently rub the adhesive residue on the transmitter until it is fully removed.
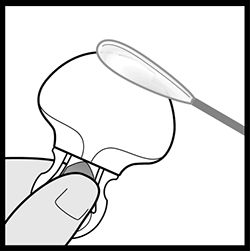
- Continue with cleaning your transmitter.
Cleaning the transmitter
- Wash your hands thoroughly.
Attach the tester to the transmitter.
- If there is adhesive residue on the transmitter, see instructions above for removing adhesive residue.
Rinse the transmitter under room temperature tap water for at least one minute, and until visibly clean. Make sure all hard-to-reach areas are rinsed completely.
- Prepare a mild liquid soap solution using 1 teaspoon (5 milliliters) of mild liquid soap per 1 gallon (3.8 liters of room temperature tap water.
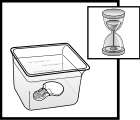
With the tester still attached, submerge the transmitter in the mild liquid soap solution and soak for one minute.
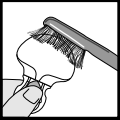
Holding the tester, brush the entire surface of the transmitter using a soft-bristled toddler toothbrush. Make sure to brush all hard-to-reach areas until visibly clean.
Rinse the transmitter under running room temperature tap water for at least one minute, and until all visible liquid soap is gone.

Dry the transmitter and tester with a clean, dry cloth.
- Place the transmitter and tester on a clean, dry cloth and air dry them completely.
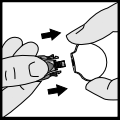
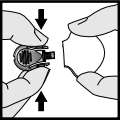
Disconnect the tester from the transmitter by gently squeezing the arms of the tester.
Storing your transmitter
Cleaning the transmitter
If ever you’re not actively using your transmitter, store the transmitter (along with the charger and tester) in a clean, dry location at room temperature. Although not required, you may store the transmitter on the charger. Don’t store the transmitter on the charger for more than 60 days at a time, as it can permanently damage the battery.

Replacing your transmitter
Linking your transmitter to your device
If you’ve received a replacement transmitter, follow the steps below to connect the transmitter to your device.
Important: Before you link your transmitter to your device, make sure the sensor feature is turned on. To check that your sensor feature is turned on:
- For MiniMed™ 670G/770G/780G insulin pump: Main Menu > Options > Utilities > Sensor Settings > Sensor: On
- For MiniMed™ 630G insulin pump: Main Menu > Sensor Settings > Sensor: On
MiniMed™ 670G/770G/780G system
- Make sure the transmitter is on the gray charger.
- Navigate in your pump to: Main Menu > Options > Utilities > Device Options > Manage Devices > Select your CGM number > Delete.
- Once your old transmitter is deleted from your pump, you can now connect your new one.
- Navigate: Main Menu > Options > Utilities > Device Options > Pair Device.
- Remove the transmitter from the charger watching for the green light to blink on the transmitter – immediately select search on your pump.
- Once the pump detects the transmitter, a message will pop up displaying the serial number (starting with “GT”) that’s on the back of the transmitter. Check that it matches your new transmitter, select it by pressing the center button, then select confirm to pair the device.
- Once the pump displays "Pairing Successful", you may place the transmitter back on the charger. You are now ready to insert your sensor.

MiniMed™ 630G system
- Make sure the transmitter is on the gray charger.
- Navigate in your pump to: Main Menu > Utilities > Device Options > Manage Devices > Select your CGM number > Delete.
- Once your old transmitter is deleted from your pump, you can now connect your new one.
- Navigate: Main Menu > Utilities > Device Options > Connect Devices > Auto Connect > Continue.
- Remove the transmitter from the charger watching for the green light to blink on the transmitter – immediately hit search on your pump.
- Once the pump detects the transmitter, a message will pop up displaying the serial number (starting with “GT”) that is on the back of the transmitter. Check that it matches your new transmitter and select Confirm.
- Place the transmitter back on the charger. You are now ready to insert your sensor.
Guardian™ Connect system
Re-pairing an old transmitter
- “Forget” your transmitter. Open your smartphone Settings > tap Bluetooth > find your CGM transmitter and tap the “i” next to it > tap Forget This Device.
- Follow the steps below to pair a transmitter.
Pairing a transmitter
- Open the Guardian™ app.
- Tap on the 3 parallel dashed lines in the top left-hand corner of your screen.
- Tap on Sensor & Transmitter > Pair Transmitter.
- Follow the in-app instructions to pair your replacement transmitter.
Note: Depending on your mobile phone, you may be prompted to delete or "forget" your old transmitter before pairing the new one.
Requesting a replacement transmitter
Your transmitter has a one-year warranty. The use of transmitters beyond one-year may result in reduced battery life, more frequent lost sensor alerts, and more alarms.
If at any time during that one-year warranty period you should experience a malfunction, Medtronic will replace your transmitter at no charge.
If your warranty ends and you experience malfunctions, Medtronic will need to contact your healthcare provider and insurance company to determine your coverage and if there may be an out-of-pocket cost.
You can request a replacement transmitter by calling our 24-Hour Technical Support team at 1-800-646-4633 and selecting option 1 or by logging in to your Diabetes.shop account.
