MiniMed™ 780G system frequently asked questions
Find answers to frequently asked questions related to troubleshooting and best practices for your MiniMed™ 780G system.
These daily tips can help you take care of your insulin pump so it takes care of you!
- Keep it secure: If your pump touches your skin, turn the buttons away from your body to reduce long term moisture exposure. Consider a waist pouch while exercising.
- Gentle button pushing: When pushing the buttons on your pump, use the side or pad of your finger. Try to avoid sharp objects like keys or the tips of long or acrylic fingernails.
The Temporary (Temp) Basal rate feature for use in Manual Mode, lets you immediately increase or decrease your basal insulin for the period of time (duration) that you set. It is often used for exercise and sick days. A Temp Basal can be set in either Percent (delivers a percent of the current basal rate) or by Rate (delivers the amount that you enter). Follow these pump screen instructions.
While in SmartGuard™ technology, you may set a temporary sensor glucose (SG) target (Temp Target) of 150 mg/dL for situations in which you would like your target to be temporarily higher, such as exercise. Check with your healthcare professional regarding use of a Temp Target.
Note: The auto correction feature is not active during an active Temp Target. It will resume after the Temp Target is complete. Learn how to set a Temp Target in SmartGuard™ technology.
If your pump clip breaks, you can request a replacement at no charge online by logging into your Diabetes.Shop account. Limitations apply.
Many factors impact your blood sugars around meal times, including the timing of your boluses and the components of your meal. If you are noticing high blood sugars or low blood sugars around mealtime please consult your healthcare provider to evaluate your carb ratios.
At the time of manufacture and when the reservoir and tubing are properly inserted, the MiniMed™ 780G insulin pump is waterproof. It is protected against the effects of being underwater to a depth of up to 12 feet (3.6 meters) for up to 24 hours. This is classified as IPX8 rating. See user guide for more details. The sensor and transmitter are water-resistant at 8 feet (2.4 meters) for up to 30 minutes. CGM readings may not be transmitted from the CGM to the pump while in water. The pump is not intended for submersion in water and is expected to be removed prior to swimming or bathing.
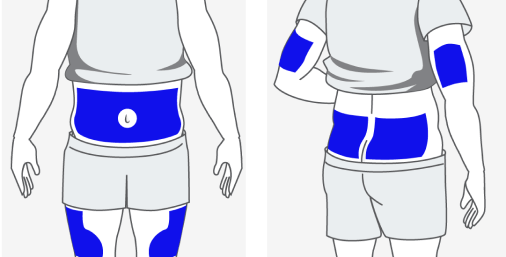
Where can I insert my infusion set?
Choose an insertion site from the shaded areas shown here:
Find infusion set support and compare infusion sets.
Please refer to the resources below based on the infusion set you use:

If bleeding occurs after sensor insertion, do the following:
- Apply steady pressure, using sterile gauze or a clean cloth placed on top of the sensor, for up to three minutes. The use of unsterile gauze can cause site infection.
- If bleeding stops, connect the transmitter to the sensor. If bleeding does not stop, do not connect the transmitter to the sensor because blood can get into the transmitter connector, and could damage the device.
If bleeding continues, causes excessive pain or discomfort, or is significantly visible in the plastic base of the sensor, do the following:
- Remove the sensor and discard.
- Check the site for redness, bleeding, irritation, pain, tenderness, or inflammation. Treat based on instructions from your healthcare professional.
- Insert a new sensor in a different location.
Review all sensor troubleshooting tips.
- Try not to calibrate with multiple blood glucose (BG) meters. It’s best to stick with the same meter for all your calibrations.
- Wash your hands before checking your BG.
- Enter the BG reading into the pump/monitor right away. Don’t use old meter BG readings or previous sensor readings as a calibration.
- If your system requires a new calibration, wait at least 15 minutes between calibration entries.
CGM alerts at night may be caused by a few different reasons ranging from sensor insertion to site placement. Here are a few tips to help prevent getting CGM alerts in the middle of the night.
- Sensor insertion, site placement, and taping make a difference. For your sensor to work its best, avoid sites where clothing may rub or constrict, where your body naturally bends which may cause the sensor to pull out and where this a lot of pressure. Follow instructions for how to insert the Guardian™ 4 sensor.
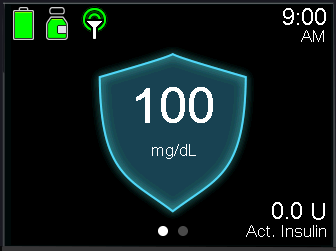
- Check your pump’s home screen before going to bed. If you’re using the SmartGuard™ technology, make sure you see the blue shield.
- Customize nighttime alert settings. Talk to your healthcare team about your alerts overnight to make sure they are personalized to meet your needs. You may consider setting them differently for the overnight period.
- Consider the Alert Silence feature. Your pump has a feature called Alert Silence, where you can temporarily silence alerts. Don’t worry, you will still get important low alerts if Alert Silence is ON. For your safety, Low SG (64 mg/dL or below) and High SG (250 mg/dL or higher for more than 3 hours) will always sound. Learn how to set Alert Silence.
Now that the Guardian™ 4 sensor is free of calibrations, additional signal checks were put in place to assess sensor reliability. The “Sensor Updating” message may occur on the pump screen when the system indicates the sensor is not working properly. Most sensors resume normal function, so there is no need to take action unless recommended by the system. If the updating lasts for more than 3 hours, the recommendation is to replace the sensor to maximize time in SmartGuard™ technology.
Understanding the Sensor Updating alert.Requesting a replacement sensor online.
- Location, Location, Location. Where you insert your sensor can make a big difference. In fact, it's best to choose a flat area on the back of your upper arm where you can "pinch an inch" that's also free of scar tissue.
- Ask for a helping hand. If you need extra support with sensor insertion on the back of your upper arm: Ask a buddy for help, stand in front of a mirror, refer to Medtronic online resources.
- Make it stick. If additional tape isn't enough, consider using an optional skin adhesive. The key here is to use it after you insert the sensor but before you apply the first oval tape. We also recommend making sure that the sensor base and transmitter are covered with two pieces of tape. If additional tape is needed, you can add it on top.
- Do not fear if "sensor updating" appears! This is a safety feature that's most likely to happen on the first day. There's nothing you need to do unless your pump alerts you. Most of the time, it resolves on its own in an hour. But if it lasts for more than 3 hours, replace the sensor and get in touch with Medtronic for help.
- Remember that the algorithm has your back. All boluses (meals and corrections) are analyzed by the algorithm to assess for safety before being delivered. If you're experiencing highs after meals, consider bolus timing and talk to your healthcare team about your carb ratio.
The Guardian™ 4 sensor does not require fingersticks for calibration.† However, every BG reading confirmed on the pump is used to calibrate the sensor. Additionally, entering a BG reading from a BG meter as desired will not negatively impact the system. Please note: the system requires a BG reading to enter SmartGuard™ technology and may require a BG from time to time to stay in automation.
The MiniMed™ 780G system is compatible with both the Guardian™ Sensor 3 and Guardian™ 4 sensor. For those ages 14 and up, the Guardian™ Sensor 3 can be worn on the back of the upper arm or abdomen. For those ages 7 and up, the Guardian™ 4 sensor can be worn on the back of the upper arm.
Here are some things you can try to help get up to 7 days wear out of your glucose sensor:
- Make sure to follow the steps for skin prep from your user guide to set your sensor up for success.
- Be sure you are wearing your sensor in the approved location. Make sure you aren’t inserting into muscle, scar tissue, or areas that experience a lot of movement. If you need additional help, ask a care partner for assistance, or stand in front of a mirror.
- Make sure to use two pieces of oval tape so that they are covering the sensor base and transmitter. Follow these taping instructions; incorrect taping is one of the most common reasons why sensors won’t stay in place.
- Try using a liquid adhesive to help your tape stick for longer. Make sure to apply the extra adhesive after you insert your sensor and before you put your tape on, especially if you’re active or in warmer climates.
Watch this video for tips to improve your sensor experience.
You can purchase adhesives and tapes at Diabetes.shop or through the product manufacturer’s website – review this list of product recommendations.
Contact 24-Hour Technical Support at 1-800-646-4633 option 1 for technical assistance or to report product issues. They can also provide a sample kit with various tapes and adhesives.Alerts with the system are customizable. Be sure to work with your healthcare provider who can help you determine how to optimize your settings.
Learn more on how to adjust your low settings.Learn more on changing your high settings.
SmartGuard™ technology, is an advanced algorithm that uses current and past sugar level trends from your CGM data to anticipate, adjust, and correct insulin delivery every 5 minutes. If your sugar levels are trending high, the system automatically gives you more insulin. If your sugar levels are trending low, the system automatically reduces the amount of insulin delivered. More importantly, if you occasionally forget to give yourself a meal dose‡ and you’re trending high, the system automatically delivers a correction dose to help bring you safely back to target.
If you are upgrading your MiniMed™ 770G insulin pump via the Software Upgrade, there is a 5-hour warm-up period before you can enter SmartGuard™ technology.
If you are starting on a new MiniMed™ 780G insulin pump (hardware) or upgrading your MiniMed™ 770G insulin pump to a brand-new hardware MiniMed™ 780G insulin pump, you will have a 48-hour warm-up period before being able to enter SmartGuard™ technology.
You can set a temporary sensor glucose target (Temp Target) of 150 mg/dL for situations when less insulin is needed, such as exercise. This can be set to as little as 30 minutes and up to 24 hours in 30-minute increments. After the programmed time, if not canceled early, the pump will automatically revert back to using the programmed SmartGuard™ auto basal target. The recommendation is to start the Temp Target 1-2 hours before beginning the activity and stopping it immediately after. Check with your healthcare professional regarding the use of Temp Target.
Review this Temp Target handout and instructions on how to set a temporary sensor glucose target.
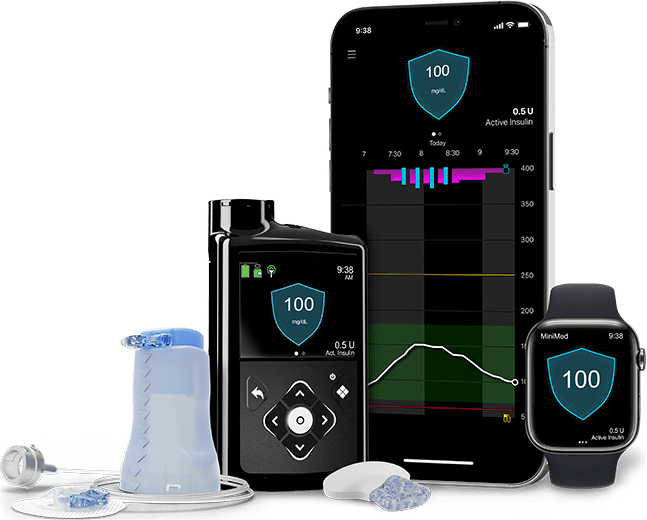
You will see a blue shield on the home screen of your pump. You can also go into your status menu.
- A compatible smartphone. Check our app compatibility list.
- MiniMed™ 780G pump needs to be within 20 feet from your smartphone.
- The app needs to be open, in the foreground or background.
- Bluetooth® connection.
Before updating your smartphone’s operating system we recommend you check our app compatibility list.
To ensure your device will continue to be compatible when new operating systems are released by Apple® or Android™, we recommend that you disable automatic OS updates so you can manually update your operating system after verifying our compatibility list on our website.If you do not have a compatible smartphone, you will be able to continue using your MiniMed™ 780G but will not be able to use the app.
You can use the regular pump screen for viewing data and use the Blue Adapter for manual downloads into CareLink™ Personal system.The following are required for your data to automatically upload to CareLink™ Software:
- Internet and Bluetooth® connection
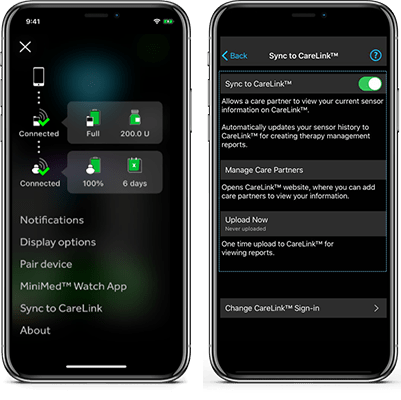
- Sync to CareLink™ option turned ON
- Stay logged into the CareLink™ software (check once weekly to make sure you are logged in)
- Keep the app open (either in foreground or perform Upload Now whenever you want to upload your pump data to CareLink software).
Click here for more information.
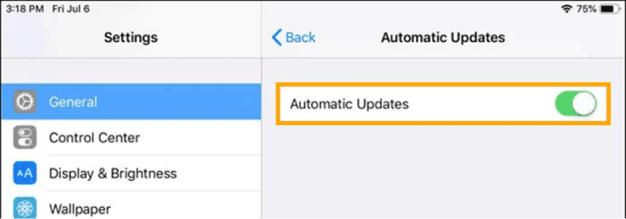
From the settings menu, go to General, go to Software Update and set Automatic Updates to the "off" position.
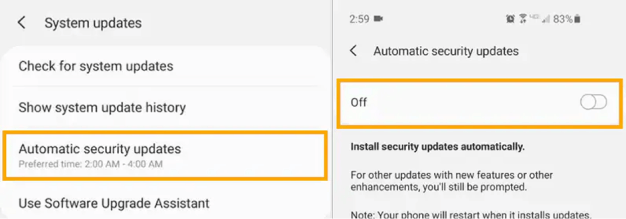
From the System updates menu, select Automatic security updates and turn Off.
You should calibrate when your glucose levels are stable. Exercise and eating can cause rapid changes in your glucose levels. That’s why many people choose to calibrate before meals and before bedtime. It’s important to always calibrate when the system asks you to or you will be exited from SmartGuard. For more information, take a look at this video about calibration best practices.
The App Manager is an accessory that comes with the MiniMed™ Mobile app already installed. It helps you pair your Instinct sensor, made by Abbott, with your MiniMed™ 780G insulin pump. This no-cost accessory is available for you if you have an insurance plan that requires us to include it as part of your sensor order, and/or if you don’t have a smartphone that is compatible with the MiniMed™ Mobile app.
You may have received an App Manager because you may have an insurance plan that requires us to send it to you as part of your sensor order. If you don’t need to use it right now, we recommend keeping the App Manager as a backup. You can use the accessory anytime to help pair your Instinct sensor with your pump.
When using the MiniMed™ Mobile app, up to five care partners can view and receive alerts through the CareLink™ Connect app.
The pump user needs to manually provide a CareLink™ Personal username to care partners and accept the care partner request to follow.
Check out this quick reference guide and our online app support for step by step instructions.To view up-to-date data, the CareLink™ Connect app user must be logged in and have internet connection on their phone. In addition, the MiniMed™ Mobile app user must have:
- Their pump and phone in range (about 20 feet)
- Their phone connected to internet access
- Sync to CareLink™ feature on
- Be logged into CareLink™ Personal on the app
The CareLink™ Connect app Home screen will indicate when data was last uploaded.
Check out the CareLink™ Connect app support page for more information and tips to improve connectivity.The MiniMed™ Mobile app can sync data to CareLink™ software automatically or manually.
The Sync to CareLink™ feature automatically sends data from the MiniMed™ Mobile app to the corresponding CareLink™ account approximately every five minutes. This feature also automatically sends data used to create CareLink™ reports approximately every 24 hours. Learn how to set up this feature.
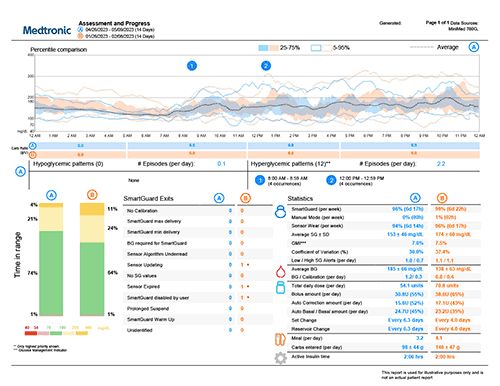
Note: When Sync to CareLink™ is off, no data will be sent to CareLink™ software or to the CareLink™ Connect app.The Assessment and Progress Report is designed to help you view your glucose management while on your MiniMed™ 780G system. You can use this report with your healthcare professional to improve the duration of time spent in SmartGuard™ technology.
Yes, you can share your data with your healthcare provider.
In order to link with them, you will need to link your account with theirs. To do so, follow these step-by-step instructions.When in SmartGuard™ technology, you can choose a target of 100 (default), 110, or 120 mg/dL and you can temporarily change your target to 150 mg/dL. The Temp Target feature is designed for any time you want less background insulin. In addition to exercise, this may include yard work, times of high stress, exams, driving, or drinking alcohol. Every person is different, but in general you could start the Temp Target 1‐2 hours before exercise and end it 1‐2 hours after. During the time the Temp Target is active, auto corrections will not be delivered.
If you find you are still dropping low during exercise, you may need to consider a combination of suspending your pump and/or consuming carbs to avoid the low altogether.
You might also benefit from these exercise tips.The TSA allows for diabetes-related supplies, equipment and medication—including liquids—through the checkpoint once they have been properly screened by X-ray or hand inspection.
If possible, pack all your supplies together in your carry-on bag so you have everything on hand. Before your screening begins, inform the officer conducting the screening about any supplies on you or in your carry-on.
Read more about flying with your diabetes supplies and how-to pass-through security before boarding your flight.We recommend ordering when you open your last box of sensors or infusion sets. To order supplies, you have three options:
- Sign up for Scheduled Orders or place your one-time order at Diabetes.shop.
- Text SUPPLY to 22094 to start the order process.
- Call us between 8 a.m. to 6 p.m. CT during the week at 1-800-646-4633, option 2.
The Travel Loaner Program allows US-based customers to take a "back-up" insulin pump for a $50 fee every 90 days. Take a "back-up" pump when you:
- Go on a cruise
- Travel to Hawaii or Alaska
- Travel internationally
Complete the Travel Loaner form and submit it at least 2 weeks prior to your trip to ensure on-time delivery. A signature is required upon delivery and you will need to return the travel loaner when you arrive back home.
It is important that you check your blood glucose (BG) more frequently while you are traveling. The routine hassle of travel, including stress, changes in time zones, schedules and activity levels, meal times and types of food, can all affect your diabetes control. Be extra attentive to monitoring your BG frequently and be prepared to respond if needed.
Note: The Travel Loaner Program only includes insulin pumps and does not include blood glucose meters or CGM devices.


The MiniMed™ 780G system is intended for the continuous delivery of basal insulin at selectable rates and the administration of insulin boluses at selectable rates for the management of type 1 diabetes mellitus in persons 7 years of age and older using the Instinct, Simplera Sync™ or Guardian™ 4 sensor, and of type 2 diabetes mellitus in persons 18 years of age and older requiring insulin using the Simplera Sync™ or Guardian™ 4 sensor.
The MiniMed™ 780G System includes SmartGuard™ technology, which can be programmed to automatically adjust insulin delivery based on the continuous glucose monitoring (CGM) sensor glucose values and can suspend delivery of insulin when the sensor glucose (SG) value falls below or is predicted to fall below predefined threshold values. The system is intended for use with connected sensors, including the Simplera Sync™ and Guardian™ 4 sensors and integrated continuous glucose monitors, including the Instinct sensor, each of which has different wear-time, form factor, insertion site, and other distinguishing characteristics that relate to sensor performance. Consult the appropriate sensor user guide when using the system. Discuss treatment decisions with your HCP.
WARNING: Do not use the SmartGuard™ feature for people who require less than 8 units or more than 250 units of total daily insulin per day. A total daily dose of at least 8 units, but no more than 250 units, is required to operate in the SmartGuard™ feature.
WARNING: Do not use the MiniMed™ 780G system until appropriate training has been received from a healthcare professional. Training is essential to ensure the safe use of the MiniMed™ 780G system.
WARNING: Do not use SG values to make treatment decisions, including delivering a bolus, while the pump is in Manual Mode. When the SmartGuard™ feature is active and you are no longer in Manual Mode, the pump uses an SG value, when available, to calculate a bolus amount. However, if your symptoms do not match the SG value, use a blood glucose (BG) meter to confirm the SG value. Failure to confirm glucose levels when your symptoms do not match the SG value can result in the infusion of too much or too little insulin, which may cause hypoglycemia or hyperglycemia.
Pump therapy is not recommended for people whose vision or hearing does not allow for the recognition of pump signals, alerts, or alarms. The safety of the MiniMed™ 780G system has not been studied in pregnant women, persons with type 2 diabetes using the Instinct sensor, or in persons using other anti-hyperglycemic therapies that do not include insulin. For complete details of the system, including accessories and additional important safety information concerning indications, contraindications, warnings and precautions associated with the system and its components, please consult https://www.medtronicdiabetes.com/important-safety-information and the appropriate user guide at https://www.medtronicdiabetes.com/download-library.